Showing posts with label Fixing & DIY. Show all posts

Wednesday, 29 April 2015

Your very own dagger

You know how you've always wanted a "Bowie knife", or just a big knife for general camping use? Well I do, and having worked in an outdoor store I have a couple already, and they're really nice ones too. Why then make a new, crappy looking one.
Answer is simple, the new and shiny knife from the shop is expensive, and I might be the only one, but I'm a little afraid of damaging them, so I don't actually use them that much...
I was in a charity shop and found this knife for 2€, and thought "heck, so what if I ruin it trying". 
 This knife was slightly bent, but made of decent steel (most kitchen knives over 1 mm. thickness are today). So I bought it. Being a kitchen knife, it was also too big (big knives are good, but even that has a end). It's barely visible, but I've drawn a design on the knife blade. (You don't need one with a metal handle, wood is nicer, and you can always exchange a it for a home made new handle).
 I took a hacksaw to it to get rid of the bigger bits, and was pleasantly surprised to break the hacksaw, indicating a nice hard blade on the knife. After I was done with the hacksaw I removed the rest of the unwanted blade with a grinder (making sure not to overheat the steel, bucket of water nearby is handy). If you don't have a grinder, a coarse wet stone will do. After a little fine tuning with a file, the knife was ready for the wet stone.
Now the knife is nice and sharp, and I need to come up with a way to make a sheath. I would also like to polish the knife, guess I'll do something with very fine sand paper or use some fabric with the dust from the wet stone as abrasive.
Knife is ~15 cm. now, a good length for most wood craft.

The sheath. I forgot to take a lot of pictures of the process, but you'll get the idea.
As this is mostly just to try it out, I just located the toughest wood we had. Some hardwood would be better, but plywood is glued from lots of layers, making stiffer and less prone to moisture damage. I chose a wood sheath, as I did not have any leather of a suitable thickness to make a wrap around sheath. Plywood turned out to be a good choice, one can take of one of the layers at a time, providing an easier way of making even knife shaped hole in the wood. (This is the step you need to imagine).
The sheath is made from two pieces of wood, each with a blade shaped hole in it. These two are glued together to form the sheath.


I'm a big fan of leather for this kind of stuff, so I fashioned some leather to wrap around the wooden sheath. This leather is too thin and soft to function as a sheath in it's own right. The top part, where the belt loop is, is a double layer that ends at the stitch going across the sheath. The rest is a single layer of leather, suede side in, wrapped around the wooden sheath, and pulled tight with stitching.


You can just see the wooden insert into the leather wrapping, and the belt loop as a simple hole in the double leather at the top part.


I'm really looking forward to trying this out in the wild. My hopes are that the leather will protect the wood from the wet, while the wood will provide a snug home for the knife.
At this point, I'm a little bit sad I didn't get a knife with a wooden handle, but that's for another time!

Update!
I have upgraded the handle for the knife. I didn't love the metallic handle (and it was blasted cold in the winter). I did not take any pictures during the process, but I'm sure you'll get the idea.
The original knife handle was just steel. I grinded this off on both sides, and found out that the handle was hollow! This left me with two prongs sticking out from the blade - not a stable handle!
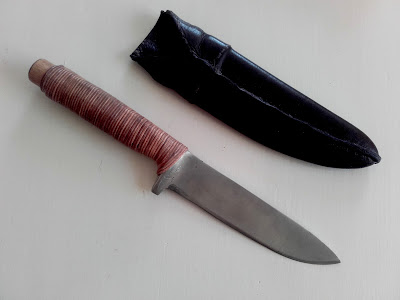
An old broomstick handle to the rescue. I took ~15 cm of the handle, added lots of glue and hammered the round wood in between the two steel prongs. All this I then wrapped (tightly) in leather string and covered it in glue to make the wrapping permanent and waterproof.
I like this result better!


Monday, 27 April 2015

About yeast

So I was visiting my friend (a chemical engineer), and it was beer brewing day. to control the temperature he uses a little "Arduino" board, that can communicate with e.g. MatLab.

We wanted to find the best way of "starting" the yeast for the brewing, so I looked online, and found that yeast is actually pretty tough - I told him to add a little sugar in some water with the yeast.
This answer of cause does not satisfy anyone, so I decided to do a little home experimenting. Knowing that I wouldn't want to spend the whole week, I opted for the little experiment, using no replications and only 20 samples.
The experiment was as follows:
Find out how best to start your yeast. I assumed that sugar and salt were deciding factors, sugar speeding up the growth and salt slowing it/killing it. The concentrations I tested were of the top of my head (no literature search here), so only one of the parameters had good values.
For testing salt and sugar I used beer bottles, as they are easy/fun to come by, and to measure yeast activity I used balloons. Yeast produces CO2 as it ferments sugar, so the bigger the balloon, the healthier the yeast.
See the setup in the picture below.
The result are pretty clear I think, though they deserve a little commenting.
  • It seems that no salt and 4% salt are worse for yeast than 0.5-2% salt.
  • For sugar the it seems that the sweeter the better, and my 4% were not high enough to inhibit the yeast growth. The yeast article on Wikipedia seems to indicate that sugar should inhibit the growth at some point.
  • Yeast doesn't do anything in salt water.
This last comment might seem obvious, but it is not so as it was not only salt I had in the top five bottles. My first attempt on this set-up used dry yeast, which I had dissolved in water at 1% w/w concentration. All of the yeast died! So now you know that you should never try to start dry yeast in pure water (in Denmark there's no additives in dried yeast, while in other countries you can get it with e.g. ascorbic acid and growth medium, in which case it might work with pure water). This dead yeast concentration was added to the bottles prior to the live yeast being added, the latter only added after 6 hours of no activity. One could argue I should have redone the whole thing, but I thought it interesting to see if live yeast could "eat" dead dried yeast (the top row). It doesn't look like it.

So to sum up: If you want happy and strong yeast in your dough, use 0.5-2% salt, and at least 4% sugar. Word of advice, I'd go for 2% salt, as it tastes better, and improves the structure of the bread (less dry, tougher).

Feel free to copy and improve on this. In my humble opinion it's a great little experiment for school as well as for the curious kids at home.  

Thursday, 23 April 2015

How to make a leather bottle al á Viking (or whatever oldschool badass culture)

I was at a Viking market south of Odense, Denmark, and I saw a guy with an awesome bottle!
Next step was to try to make one, so I made some coffee - one to get me going, one to keep me going.
 Using my kindergarten scissors and trusted Leatherman I fashioned two pieces of leather (bought at said Viking market) into the shape of a bottle.
 Because I did not have an awl, I used hammer and nail to make evenly spaced holes in both pieces of leather. To hold them in place use pegs, clamps or similar.
 I stitched them together using something called saddle-stitch, it's strong! The thread is hemp with bees wax. When stitching use two pliers, as it's almost impossible to pull the needles through with your fingers.
 Adding water to the thing causes it to "ballon". This one took about a litre of water. As you can see it's far from waterproof at this stage. If your stitch is tight enough though, the only place it won't leak, is your stitches!
 Playing with hot wax. I used bees wax, it's natural and it smells great. Melt it and pour it into your ( now dried) bottle, swirl it around, and empty the excess back into your melting cup. Repeat this to make sure you have a good coat.
 I chose to wax mine on the outside to, it makes the bottle really hard (think Nalgene bottle), and means the outer is waterproof too.
 I made a wooden cork for mine, I'm sure you can find other ways of closing yours.
The wooden cork is made to fit by heating up the opening of the bottle, then inserting the cork and afterwards tying some string tight around the neck of the bottle.
My bottle now hold mead more often than water :)

So I had some "Sugru" lying around

It had normal "flat/cylindrical" eye pieces. Using something called Sugru, a curable moldable rubber, I made new ones - they keep the unwanted light out!

Beer can stove, for when you should have listened to your girlfriend and brought a stove in the first place...

I had seen one of these made in a video once, making one in real life proved quite easy.
First step is the best - drink two beers (look for little "AL" sign on them, to make sure they're not laminate cans).
Then comes the somewhat harder part, you have to find a can with the same diameter as the rim of the beer can, red bull cans work, but are hard to drink... (try and pawn it of at a techno-party and have some vodka to go with it).
Cut the top of the two beer cans so that one is ~1.5 times as tall as the other. If you make a really tall one, you can cook longer before the fuel runs out, but it'll be more unstable as well. Try to cut really neatly. Now make evenly spaced holes (Ø<1mm) around the side of the tallest bottom part. In this same can take out the inner curved part that was the bottom of the beer can. Then cut the redbull can to the combined height of the two beer cans, when they're stuck fully into one another (this can be tricky).
After this you're good to go. Fill about 2/3 with ethanol and light through big centre opening. Let the stove heat up. When the ethanol is boiling put your desired pot on it, closing the top opening and forcing ethanol steam out the side "jets". This is the whole point of this stove design, as it preheats the fuel, and by only burning the ethanol steam in little jets, it makes sure the combustion is well oxygenated - hot stuff!
All well and good - it worked great in the kitchen, but real life has wind...
I resourced some metal and made a windscreen. If you need to do this, make sure there is no holes in it under the handle of your pot! (handle will melt)
And now, just add your favourite travel food to your trusted pot, and leave to simmer.
On a side note here, my girlfriend came up with a way of shortening cooking time for pasta/lentils/rice when you're on the trail. Simply put today dinner in a half litre bottle, fill with water, and leave it in your backpack until it's dinner time (works especially well for high altitude).